
JavaScript is the programming language of the web browser and can also be found on web servers, IoT devices, and more.
You can learn about on those two websites:
Both have code examples, exercises and information you should know or be aware of.
All the following is what I’ve found important to take notes of while preparing for the Certificates.dev JavaScript Mid-level certification.
Let’s dive in!
JavaScript Fundamentals
Intro to JavaScript
For this exam, Certificates.dev expect that you should be familiar with both the basics of JavaScript and more intermediate concepts. This chapter gives a refresher of the basics that you review in their Junior Level Certification.
Basic Debugging
During the certification exam, you should know simple issues you might face writing JavaScript and how you can fix those issues using the console and console.log.
Variables and Data Types
Variables are like containers where you can store and label different types of information. That information can be a string of characters like those that makeup your name or a number that can be used in Math equations, like your age, or a variety of other types.
During the exam you’ll need to know the various ways of declaring variables with let and const. You’ll also need to be familiar with primitive data types like strings, numbers, and booleans. Later on we’ll also discuss more complex types, like arrays and objects.
My notes were the following:
- Using
string[index], you can access the character at the index, or position in the string, if it’s a valid index. - Variables named
appleandAPPLEare two different variables. - Even if without
use strictwe can create a variable without an assignment, it’s strongly recommended not to! - Hoisting is declaring a variable anywhere in the code and this is equivalent to declaring it at the top. It’s performed before any execution occurs.
- However,
vardeclarations are only hoisted to the top of the current script. If you have two<script>elements within one HTML, the first script can’t access variables declared by the second before the second script has been processed and executed. - The meaning of
undefinedis “value isn’t assigned”.
Basic Operators
For the exam, you should know how to use operators to perform match operations and comparisons.
- MDN > Basic math in JavaScript — numbers and operators
- JavaScript.info > Basic Operators, maths
- JavaScript.info > Comparisons
For example, when comparing string, remember that:
- it compares unicode values so the unicode value of
a(U+0061) is lower thanä(U+00E4). - it compares the characters at the same index in both string, one by one until the end of the shorter string is reached or both strings.
The binary + always concatenates the operands if one operand is a string.
The unary + converts any other type to the number equivalent. Remember: unary takes precedence to binary operation.
The binary - convert the operands to numbers. Same with > or < or /or *.
⚠️ Warning
No conversion though with ==.
Number conversion of undefined or any alphabetical only string produces aNaN .
Number conversion makesnull become a 0 .
Be careful:
|
|
Don’t use comparisons >=, >, < or <= with a variable which may be null/undefined, unless you’re really sure of what you’re doing.
The prefix form (for ex: ++counter) increments counter and returns the new value. However the postfix form (for ex: counter++) increments counter and returns the old value.
Arrays
Arrays allow us to store lists of data. For example, a list of products to display on an e-commerce site or a list of news articles to browse through.
For the exam, you should know the basics of working with arrays; things like: getting array length, adding new items to arrays, accessing an item at a specific index, removing items from arrays, and more.
For this exam, you’ll also need to know advanced array methods but we’ll cover that in the Advanced Array and Object Methods chapter.
For example, someArray.at(-1) is equivalent to someArray[someArray.length - 1].
But you can’t go beyond the array length negatively as you can go positively. Otherwise, you get a undefined.
Methods push/pop run fast, while shift/unshift are slow.
Use for...of on arrays if you don’t need the index.
⚠️ BUT...
⚠️ DON’T USE for...in on arrays!
⚠️ DON’T ASSIGN property length of an array… or suffer the consequences!
⚠️ About (0 == []) is equivalent to (0 == ''), that itself is equivalent to (0 == 0) that finally is true.
Control Structures
Conditionals are how we give our code the ability to make decisions based on the values of our variables. Loops are useful for doing the same thing over and over again.
For example, the precedence of AND (&&) operator is higher than OR (||).
The do...while syntax should only be used when you want the body of the loop to execute at least once regardless of the condition being truthy. Otherwise, the other form is preferred: while(…) {…}.
Understand the for loops below:
|
|
You can label imbricated loops to beak/continue the outer one:
|
|
Any expression can be a switch/case argument:
|
|
Also, equality check is always strict on a switch.
Functions
Functions allow you to store a piece of code that does a single task inside a defined block. Then call that code whenever you need it using a single short command — rather than having to type out the same code multiple times.
Learn the various syntax for defining functions, how to call functions, and how to make them flexible with arguments.
If a same-named variable is declared inside the function then it shadows the outer one. For instance, in the code below the function uses the local userName. The outer one is ignored:
|
|
Minimize the use of global variables.
A parameter is the variable listed inside the parentheses in the function declaration (it’s a declaration time term).
An argument is the value that is passed to the function when it’s called (it’s a call time term).
A function returns undefined by default if no return or an empty return is used.
⚠️ A function should do exactly what is suggested by its name, no more.
A Function Expression is created when the execution reaches it and is usable only from that moment. So it can’t be called before.
Contrary, a Function Declaration can be called earlier than it’s defined. However, in strict mode, when a Function Declaration is within a code block, it’s visible everywhere inside that block, but not outside of it.
In arrow functions, this is undefined! Arrow functions don’t have their own this. Consequently, they don’t have the special arguments object either.
Below, arguments corresponds to the sayHi method.
|
|
Without arrow function, we’d write the following code:
|
|
Objects
Objects are data structures used for grouping variables (properties) together with related functions (methods).
I talk about this in my notes on the Junior level certification.
DOM Manipulation
What is the DOM and Traversing It
The Document Object Model, or DOM for short, represents all page content as objects that can be modified. The document object is the main “entry point” to the page. We can change or create anything on the page using it. For the exam, know the basics of what the DOM is and how to interact with it.
So DOM = Document Object Model and BOM = Browser Object Model.
If we put something after </body>, then that is automatically moved inside the body, at the end, as the HTML spec requires that all content must be inside <body>.
Browsers automatically process errors in the document: close tags, add missing ones (tbody) and so on. But in my experience, it doesn’t solve everything. The best is to use a formatter like Prettier in your IDE to know, as you code, when the syntax is incorrect.
In particular, if a script is inside <head>, then document.body is unavailable, because the browser didn’t read it yet. That’s why scripts are usually put at the bottom of the body tag.
|
|
If we run the example above, the last element shown is <script>. In fact, the document has more stuff below, but at the moment of the script execution the browser didn’t read it yet, so the script doesn’t see it.
childNodes looks like an array. But actually it’s not an array, but rather a collection. You can use for...of on it since the Symbol.iteratoris set.
⚠️ DON’T USE for...in on DOM collections.
But you can’t use array methods on DOM collection. To be able to, cast the collection using Array.from to transform the collection into an array.
⚠️ DOM collections are read-only.
The parentElement property returns the parent “element”, while parentNode returns “any node” that is the parent. These properties are usually the same: they both get the parent.
With the one exception of document.documentElement:
|
|
Targeting and Manipulating Elements
With JavaScript, it’s easy to query the DOM for a specific element.
Searching: getElement*, querySelector*
⚠️ Please don’t use id-named global variables to access elements.
|
|
The method getElementById can be called only on document object. It looks for the given id in the whole document.
Check out the interesting closest method:
|
|
All methods "getElementsBy*" (ByTag, ByName, etc.) return a live collection. Such collections always reflect the current state of the document and “auto-update” when it changes.
In contrast, querySelectorAll returns a static collection.
| Method | Searches by… | Can call on an element? | Live? |
|---|---|---|---|
querySelector |
CSS-selector | ✔ | ❌ |
querySelectorAll |
CSS-selector | ✔ | ❌ |
getElementById |
id |
- | ❌ |
getElementsByName |
name |
- | ✅ |
getElementsByTagName |
tag or '*' |
✔ | ✅ |
getElementsByClassName |
class | ✔ | ✅ |
Nodes properties
The nodeType property provides one more, “old-fashioned” way to get the “type” of a DOM node. However, in modern scripts, we sohuld use instanceof.
innerHTML works on elements objects, not node.
“innerHTML+=” does a full overwrite
⚠️ Therefore, as the content is “zeroed-out” and rewritten from scratch, all images and other resources will be reloaded.
About outerHTML :
|
|
So what happened in div.outerHTML=... is:
divwas removed from the document.- Another piece of HTML
<p>A new element</p>was inserted in its place. divstill has its old value. The new HTML wasn’t saved to any variable.
Attributes and properties
The browser parses one-to-one known HTML attributes to DOM properties on an element basis (since they aren’t the same always).
The non-standard attributes aren’t parsed.
All attributes are accessible by using the following methods:
elem.attributes: get all attributes.elem.hasAttribute(name): checks for existence.elem.getAttribute(name): gets the value.elem.setAttribute(name, value): sets the value.elem.removeAttribute(name): removes the attribute.
Attribute names are case-insensitive.
Property-attribute synchronization is automatic, but not for input ’s value.
Why would using an attribute be preferable to having classes like .order-state-new, .order-state-pending, .order-state-canceled?
Because an attribute is more convenient to manage. The state can be changed as easy as:
|
|
All attributes starting with “data-” are reserved for programmers’ use. They’re available in the dataset property. Multiword attributes like data-order-state become camel-cased: dataset.orderState.
Modifying the Document
node.append(...nodes or strings): append nodes or strings at the end ofnode,node.prepend(...nodes or strings): insert nodes or strings at the beginning ofnode,node.before(...nodes or strings): insert nodes or strings beforenode,node.after(...nodes or strings): insert nodes or strings afternode,node.replaceWith(...nodes or strings): replacesnodewith the given nodes or strings.
Strings are inserted in a safe way:
|
|
outputs:
|
|
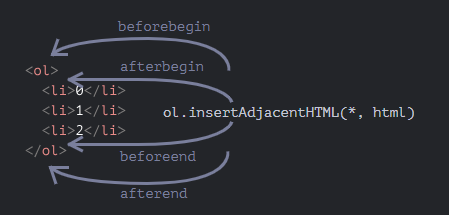
Other methods: insertAdjacentText and insertAdjacentElement that work as follows.
The call elem.cloneNode(true) creates a “deep” clone of the element – with all attributes and subelements. If we call elem.cloneNode(false), then the clone is made without child elements.
The call to document.write only works while the page is loading. If we call it afterwards, the existing document content is erased.
Styles and Classes
Methods of classList:
elem.classList.add/remove("class"): adds/removes the class.elem.classList.toggle("class"): adds the class if it doesn’t exist, otherwise removes it.elem.classList.contains("class"): checks for the given class, returnstrue/false.
Browser-prefixed properties like -moz-border-radius, -webkit-border-radius follow this rule: a dash means an upper case.
Otherwise, for a multi-word property, camelCase is used.
There is a special method for that, elem.style.removeProperty('style property').
To set the full-style like div.style="color: red; width: 100px", use the special property style.cssText.
⚠️ Don’t forget to add CSS units to CSS property values.
The style property operates only on the value of the "style" attribute, without any CSS cascade.
To get the style of CSS classes, you need to use getComputedStyle(element, [pseudo]).
⚠️ getComputedStyle requires the full property name
We should always ask for the exact property that we want, like paddingLeft or marginTop or borderTopWidth. Otherwise the correct result isn’t guaranteed.
For instance, if there are properties paddingLeft/paddingTop, then what should we get for getComputedStyle(elem).padding? Nothing, or maybe a “generated” value from known paddings? There’s no standard rule here in browser implementations.
Styles applied to :visited links are hidden! Why? JavaScript may not see the styles applied by :visited. And also, there’s a limitation in CSS that forbids applying geometry-changing styles in :visited. That’s to guarantee that there’s no way for an evil page to test if a link was visited and hence to break the privacy.
Events
Event Handling
Reacting to user events such as clicking, scrolling, moving the mouse, and more is an essential skill to master when using JavaScript in the browser.
As we know, HTML attribute names aren’t case-sensitive, so ONCLICK works as well as onClick and onCLICK… But usually attributes are lowercased: onclick.
However, DOM properties are case-sensitive.
As there’s only one onclick property, we can’t assign more than one event handler. Otherwise, the JavaScript handler overwrites the in-HTML handler.
The value of this inside a handler is the element targeted.
Be careful:
|
|
Don’t use setAttribute for handlers.
The syntax to add a handler: element.addEventListener(event, handler, [options]);.
eventis the event name, e.g."click".**handlerhandleris the function that handles the event.optionsis an additional optional object with properties like:once: iftrue, then the listener is automatically removed after it triggers.capture: the phase where to handle the event, to be covered later in the chapter Bubbling and capturing. For historical reasons,optionscan also befalse/true, that’s the same as{capture: false/true}.passive: iftrue, then the handler won’t callpreventDefault(), we’ll explain that later in Browser default actions.
To remove a handler we should pass exactly the same function as was assigned.
So this doesn’t work:
elem.addEventListener( "click" , () => alert('Thanks!'));// .... elem.removeEventListener( "click", () => alert('Thanks!'));
The handler won’t be removed, because removeEventListener gets another function – with the same code, but that doesn’t matter, as it’s a different function object.
Here’s the right way:
`function handler() {alert( ‘Thanks!’ );}
input.addEventListener(“click”, handler);// …. input.removeEventListener(“click”, handler);`
Please note – if we don’t store the function in a variable, then we can’t remove it. There’s no way to “read back” handlers assigned by addEventListener.
For some events, handlers only work with addEventListener, for example, the DOMContentLoaded event.
We can assign not just a function, but an object as an event handler using addEventListener. When an event occurs, its handleEvent method is called.
|
|
We could also use objects of a custom class.
The method handleEvent doesn’t have to do all the job by itself. It can call other event-specific methods instead:
|
|
Event handlers can also be removed by passing an AbortSignal to addEventListener() and then later calling abort() on the controller owning the AbortSignal. For example, to add an event handler that we can remove with an AbortSignal:
|
|
About removing handlers, beside using removeEventListener, you can use this method:
|
|
Then the event handler created by the code above can be removed like this:
|
|
Event Bubbling
Webpages are made up of nested elements, meaning that a JavaScript must support event bubbling. You should be familiar with what event bubbling is, how to work with methods like stopPropagation, and how to utilize it for event delegation.
Reacting to user events such as clicking, scrolling, moving the mouse, and more is an essential skill to master when using JavaScript in the browser.
Bubbling and Capturing
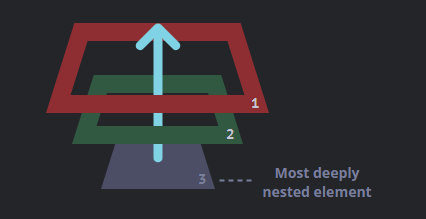
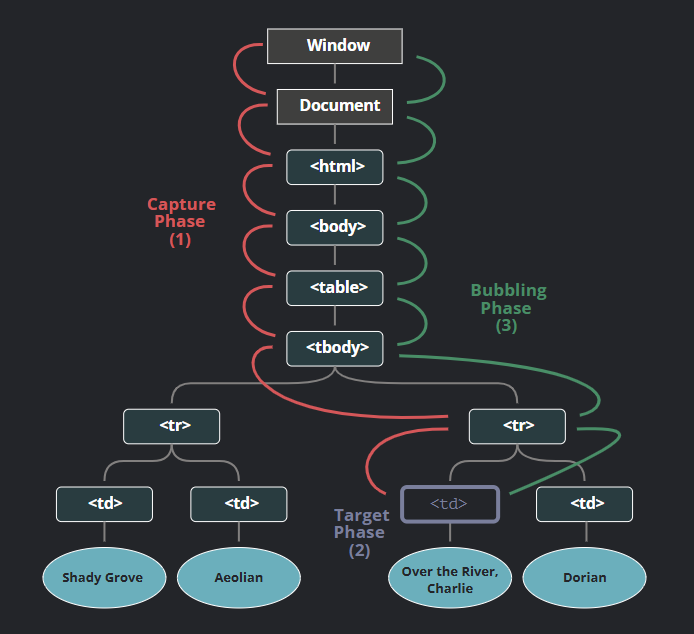
When an event happens on an element, it first runs the handlers on it, then on its parent, then all the way up on other ancestors.
Source: https://javascript.info/bubbling-and-capturing
Almost all events bubble, except for a focus event.
The method stopPropagation() stops the propagation, but only on the handler using it. On other handlers for the same elements, propagation will occur. To stop propagation on all handler, use event.stopImmediatePropagation() .
Don’t stop bubbling without a need!
⚠️ Instead of preventing bubbling, using custom events can help without event.stopPropagation() hidden pitfalls.
Source: https://javascript.info/bubbling-and-capturing
To catch an event on the capturing phase, we need to set the handler capture option to true.
|
|
⚠️ To remove the handler, removeEventListener needs the same phase. And the event.stopPropagation() during the capturing also prevents the bubbling.
Event Delegation
The idea is that if we have a lot of elements handled in a similar way, then instead of assigning a handler to each of them – we put a single handler on their common ancestor.
⚠️ For document-level handlers – always addEventListener
We can also use event delegation to add “behaviors” to elements declaratively, with special attributes and classes. For ex:
|
|
Common UI Events
There are a plenty of user triggered events that JavaScript developers can listen for. You should be familiar with some of the most commons ones: mouse events, scroll, pointer events, and keyboard events:
Mouse Events
On mouse event, you can use these properties:
shiftKey: ShiftaltKey: Alt (or Opt for Mac)ctrlKey: CtrlmetaKey: Cmd for Mac
About metaKey : on Mac it’s usually Cmd instead of Ctrl so where a Windows user presses Ctrl+Enter or Ctrl+A, a Mac user would press Cmd+Enter or Cmd+A, and so on.
So for JS-code it means that we should check if (event.ctrlKey || event.metaKey).
But there are also mobile devices, so if their device doesn’t a keyboard, then there should be a way to live without modifier keys.
Using metakey with events:
|
|
Now, you should know about the double-click caveat:
|
|
If we want to disable selection to protect our page content from copy-pasting, then we can use another event: oncopy.
Moving the mouse
Interesting events mouseover/mouseout, relatedTarget : read more at Events mouseover/mouseout, relatedTarget.
I’m sure not to grasp the Mouseout when leaving for a child scenario. Maybe read it again.
It seems that there is an extra mouseover.
Compared to mouseover/mouseout, there are two important differences with mouseenter/mouseleave:
- Transitions inside the element, to/from descendants, aren’t counted.
- Events
mouseenter/mouseleavedon’t bubble. So we can’t use event delegation with them.
⚠️ I feel there’ll be something about this in the code challenge of the exam.
Drag’n’Drop with mouse events
The browser has its own drag’n’drop support for images and some other elements. It runs automatically and can conflict with any customization.
To disable it:
|
|
⚠️ Also, be aware of the positioning: see the example > Correct positioning
Check out the example of a dragged element over droppable element: Potential drop targets (droppables)
Pointer events
Unless you develop for old browsers, such as Internet Explorer 10, or for Safari 12 or below, there’s no point in using mouse or touch events any more – we can switch to pointer events.
| Pointer event | Similar mouse event |
|---|---|
pointerdown |
mousedown |
pointerup |
mouseup |
pointermove |
mousemove |
pointerover |
mouseover |
pointerout |
mouseout |
pointerenter |
mouseenter |
pointerleave |
mouseleave |
pointercancel |
- |
gotpointercapture |
- |
lostpointercapture |
- |
We can replace mouse<event> events with pointer<event> in our code and expect things to continue working fine with mouse.
The support for touch devices will also “magically” improve. Although, we may need to add touch-action: none in some places in the CSS.
Keyboard: keydown and keyup
The key property of the event object allows to get the character, while the code property of the event object allows to get the “physical key code”.
Case matters: "KeyZ", not "keyZ" ?
To reliably track layout-dependent characters, event.key may be a better way.
On the other hand, event.code has the benefit of staying always the same, bound to the physical key location. So hotkeys that rely on it work well even in case of a language switch.
Do we want to handle layout-dependant keys? Then event.key is the way to go.
We want a hotkey to work even after a language switch? Then event.code may be better.
Which to use: key or code property?
For events triggered by auto-repeat, the event object has event.repeat property set to true.
⚠️ On form inputs, be aware of the Enter key behavior that submits the form if the focus is inside any input. To cancel this, use keydown, not keyup event to cancel browser default behavior.
Scrolling
This article summarizes the properties to use to calculate position in the windows when the scroll, scrollendor scrollstarthappen.
Advanced Functions
This is the part I have the most difficulty to grasp…
But there is a very good code challenge if you purchase the preparation bundle. So I recommend that you get it if you struggle with the following concepts. To me, an example is always better than the theory.
First Class and Higher Order Functions
Functions in JavaScript are treated much like any other variable. This means they can be passed around as the argument to other functions or even returned from functions. You need to learn how to take advantage of the first-class nature of functions to create higher-order functions.
First-class Function Definition
A programming language is said to have first-class functions when functions in that language are treated like any other variable.
We assigned an Anonymous Function in a variable, then we used that variable to invoke the function by adding parentheses () at the end.
Higher-Order Functions
A function that returns a function or takes other functions as arguments is called a higher-order function.
The map or reduce functions of the Array type are examples of that.
Practical example:
|
|
Higher-order functions can help improve the legibility of your code by making it more concise and easy to understand. This can help speed up the development process and make it easier to debug code.
Second, higher-order functions can help organize your code into smaller chunks, making it easier to maintain and extend.
Callbacks
Examples of synchronous callbacks include the callbacks passed to Array.prototype.map(), Array.prototype.forEach(), etc. Examples of asynchronous callbacks include the callbacks passed to setTimeout() and Promise.prototype.then().
Is Callback a higher-order function? Or not always?
A callback isn’t inherently a higher-order function, but the two concepts are closely related in JavaScript.
-
A callback is a function passed as an argument to another function, to be invoked later (either synchronously or asynchronously). For example, in array.map(x => x * 2), the arrow function is a callback.
-
A higher-order function is any function that takes one or more functions as arguments, or returns a function as its result. For example,
map,filter, andsetTimeoutare higher-order functions because they expect a function as a parameter.
Other Advanced Function Concepts
Functions and closures are closely coupled concepts that any advanced JavaScript dev should be familiar with. Immediately invoked function expression (or IIFEs) are also a useful tool for the advanced dev. For the exam, be familiar with both of these concepts.
Closure
A closure is the combination of a function bundled together (enclosed) with references to its surrounding state (the lexical environment). In other words, a closure gives a function access to its outer scope.
In JavaScript, closures are created every time a function is created, at function creation time.
|
|
IIFE
IIFE = Immediately Invoked Function Expression
|
|
Use cases of IIFEs include:
- Avoiding polluting the global namespace by creating a new scope, which can be useful with
setIntervalorsetTimeoutused inside aforloop where you’d need access to theindexof the loop. - Creating a new async context to use
awaitin a non-async context. - Computing values with complex logic, such as using multiple statements as a single expression.
Method Chaining
Method chaining allow executing on a same instance many methods in a chain matter:
|
|
Asynchronous JavaScript and API’s
Promises and Async/Await
Many operations in JavaScript are done asynchronously. Promises and async/await are the go-to way of working with such async code.
Callback Asynchronous Programming
Here is a “callback-based” style of asynchronous programming:
|
|
Promises
It’s either one resolve or one reject.
It’s recommended to reject with Error objects.
The properties state and result of the Promise object are internal. We can’t directly access them. We can use the methods .then, .catch and .finally for that. They’re described below:
-
.thenfollow the lastresolve1 2 3 4 5 6 7 8 9 10let promise = new Promise((resolve) => { setTimeout(() => resolve("done!"), 1000); }); promise.then(alert); // shows "done!" after 1 second // equivalent to resolve the first function in .then promise.then( (result) => alert(result), // shows "done!" after 1 second null, // doesn't run ); -
.catchfollow the lastreject1 2 3 4 5 6 7 8 9 10let promise = new Promise(function (resolve, reject) { setTimeout(() => reject(new Error("Whoops!")), 1000); }); promise.catch(alert); // shows "Error: Whoops!" after 1 second // equivalent to reject runs the second function in .then promise.then( (result) => alert(result), // doesn't run (error) => alert(error), // shows "Error: Whoops!" after 1 second ); -
.finallyfollowcatch(orthenif you don’t use the short hand). It doesn’t get the outcome of the previous handler (it has no arguments).
We can conclude that then and finally are always called.
We can implement Thenable object which isn’t a promise:
|
|
Promises Chaining
Performing a return inside a then allows chaining to another then. The next then gets the previous thenresult.
Chaining after a timeout:
|
|
Below works the same but with step-by-step functions:
|
|
As a good practice, an asynchronous action should always return a promise. That makes it possible to plan actions after it; even if we don’t plan to extend the chain now, we may need it later.
Error Handling With Promises
The easiest way to catch all errors is to append .catch to the end of the chain.
Why catch? The code of a promise executor and promise handlers has an “invisible try..catch” around it. If an exception happens, it gets caught and treated as a rejection.
To catch any error not caught by a promise handler, you can catch such errors using the event unhandledrejection:
|
|
Promise API
-
Promise.all(iterable): wait all promises initerableare resolved to use the nextthen.-
If any of the promises is rejected, the promise returned by
Promise.allimmediately rejects with that error. Therefore, other promises are ignored. -
Promise.all(iterable)allows non-promise “regular” values initerable1 2 3 4 5 6 7Promise.all([ new Promise((resolve, reject) => { setTimeout(() => resolve(1), 1000); }), 2, 3, ]).then(alert); // 1, 2, 3
-
-
Promise.allSettled(): waits for all promises to settle, regardless of individual result.-
For example, we’d like to fetch the information about multiple users. Even if one request fails, we’re still interested in the others.
-
For each promise, the result looks like this:
1 2 3 4 5[ {status: 'fulfilled', value: ...response...}, {status: 'fulfilled', value: ...response...}, {status: 'rejected', reason: ...error object...} ]
-
-
Promise.race: similar toPromise.allbut waits only for the first settled promise and gets its result (or error).1 2 3 4 5 6 7Promise.race([ new Promise((resolve, reject) => setTimeout(() => resolve(1), 1000)), new Promise((resolve, reject) => setTimeout(() => reject(new Error("Whoops!")), 2000), ), new Promise((resolve, reject) => setTimeout(() => resolve(3), 3000)), ]).then(alert); // 1 -
Promise.any(promises)(recently added method) – waits for the first promise to fulfill, and its result becomes the outcome. If all of the given promises are rejected,AggregateErrorbecomes the error ofPromise.any.
Promisification
“Promisification” is a long word for the conversion of a function that accepts a callback into a function that returns a promise.
Check out this full example.
Microtasks
Promise handling is always asynchronous, as all promise actions pass through the internal “promise jobs” queue, also called “microtask queue” (V8 term).
So .then/catch/finally handlers are always called after the current code is finished.
If we need to guarantee that a piece of code is executed after .then/catch/finally, we can add it into a chained .then call.
In most JavaScript engines, including browsers and Node.js, the concept of microtasks is closely tied with the “event loop” and “macrotasks”. As these have no direct relation to promises, they’re covered in another part of the tutorial, in the article Event loop: microtasks and macrotasks.
Async/await
The word “async” before a function means one simple thing: a function always returns a promise IMPLICITLY but we could also return a promise explicitly as well.
The keyword await makes JavaScript wait until that promise settles and returns its result. It works only inside async functions.
So the following doesn’t work:
|
|
In modern browsers, await on top level works just fine, when we’re inside a module.
If we’re not using modules, or older browsers must be supported, there’s a universal recipe: wrapping into an anonymous async function or IIFE.
When we use async/await, we rarely need .then, because await handles the waiting for us. And we can use a regular try..catch instead of .catch. That’s usually (but not always) more convenient.
But at the top level of the code, when we’re outside any async function, we’re syntactically unable to use await, so it’s a normal practice to add .then/catch to handle the final result or falling-through error.
Data Fetching and JSON
One very common asynchronous operation is fetching JSON data from a remote server. The time it takes to receive a response will always be variable and depend on server conditions, network conditions, and more. Learn to use the native fetch function and the JSON object to fetch and parse data.
Fetching Data From the Server
You can use two methods :
- Fetch API (preferred)
- XHR API (old)
There is a third way...
In an article, I wrote how you can handle data-fetching in an interesting manner.
Using Fetch
Example:
|
|
Or using pure promises syntax:
|
|
⚠️ We can choose only one body-reading method: response.text()or response.json().
The response contains the headers:
|
|
On the request, you can set headers. But there’s a list of forbidden HTTP headers that we can’t set. These headers ensure proper and safe HTTP, so they’re controlled exclusively by the browser.
JSON
Working with JSON
The methods available are:
JSON.stringifyJSON.parse
You can the first method on these data types:
- Objects
{ ... } - Arrays
[ ... ] - Primitives:
- strings,
- numbers,
- boolean values
true/false, null.
JSON is data-only language-independent specification, so some JavaScript-specific object properties are skipped by JSON.stringify.
Namely:
- Function properties (methods).
- Symbolic keys and values.
- Properties that store
undefined.
The important limitation
No circular references can exist!
Here is the full specs of JSON.stringify:
|
|
Advanced Array and Object Methods
Advanced Array Methods
Arrays have many powerful methods built in making it easier to accomplish almost anything with a list of items.
Check out MDN > Array.
Advanced Object Methods
Objects have considerably less useful methods available and yet you’ll find yourself reach for a handful of them quite often.
Check out MDN > Objects.
-
Object.entries:1 2 3 4 5 6 7 8 9 10 11 12const object1 = { a: "somestring", b: 42, }; for (const [key, value] of Object.entries(object1)) { console.log(`${key}: ${value}`); } // Expected output: // "a: somestring" // "b: 42" -
Object.assign(target, source1, source2, /* …, */ sourceN)copies all enumerable own properties from one or more source objects to a target object. It returns the modified target object. -
Object.freeze(obj)prevents object’s extensions and makes existing properties non-writable and non-configurable. TheObject.freeze()static method freezes an object. In other words, new properties can’t be added, existing properties can’t be removed, their enumerability, configurability, writability, or value can’t be changed, and the object’s prototype can’t be reassigned.freeze()returns the same object that was passed in. -
Object.prototype.hasOwnProperty(obj, prop)(or recently renamedObject.prototype.hasOwn(obj, prop)) returns a boolean indicating whether this object has the specified property as its own property (as opposed to inheriting it)..hasOwn()is recommended over.hasOwnProperty(), in browsers where it’s supported.
ES6+ Features
Miscellaneous ES6+ Improvements
JavaScript ES6 brought a wealth of new and useful features over 10 years ago that are still huge timesavers to this day. You should familiarize yourself with the following syntax.
Spread and Rest
⚠️ The rest parameters must be at the end.
|
|
arguments is both array-like and iterable, it’s not an array and so doesn’t support array methods.
Destructuring Arrays
“Destructuring” doesn’t mean “destructive”.
You can ignore elements using commas:
|
|
It works with any iterable on the right side, like looping with .entries():
|
|
And you need to know the “Swap variables trick”:
|
|
If the array is shorter than the list of variables on the left, there will be no errors. Absent values are considered undefined. So if you need something else than undefined, use the default value syntax:
|
|
Destructuring Objects
If we have a complex object with many properties, we can extract only what we need.
If we want to assign a property to a variable with another name, for instance, make options.width go into the variable named w, then we can set the variable name using a colon.
For potentially missing properties we can set default values using "=", similar to arrays.
The ...rest works as well on Objects and must go at the end.
Gotcha if there’s no let : if you declare the object properties before the destructuring and destructure some props of the object using those variables, it’ll fail because { var1, var2, var3 } = myObject; is considered as a variable redeclaration, which isn’t possible:
|
|
So do this instead (kinda of a IIFE):
|
|
And if you need complex destructuring:
|
|
Finally, you can use destructuring in the method’s parameters if the argument passed is an object.
JavaScript Modules
JavaScript modules allow us to split up our scripts into various files for the sake of organization and encapsulation. Read up on how they work and how to use them to prepare for the exam.
Checkout JavaScript.info > Modules to learn more.
Here are my summary:
-
Modules always work in strict mode, e.g., assigning to an undeclared variable will throw an error.
-
Each module has its own top-level scope. In other words, top-level variables and functions from a module aren’t seen in other scripts. Unless a given module imports another explicitly. But that other script can only import the first exports.
-
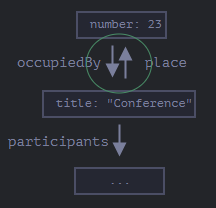
A module is executed only once, on the first import. Exports are generated, and then they’re shared between importers, so if something changes the imported object, other importers will see that.
-
The object
import.metacontains the information about the current module. -
In a module, “this” is undefined.
-
Module scripts are always deferred, in other words:
- downloading external module scripts
<script type="module" src="...">doesn’t block HTML processing, they load in parallel with other resources. - module scripts wait until the HTML document is fully ready (even if they’re tiny and load faster than HTML), and then run.
- relative order of scripts is maintained: scripts that go first in the document, execute first.
- downloading external module scripts
As a side effect, module scripts always “see” the fully loaded HTML page, including HTML elements below them (remember above, a <script> before the </body> can’t see HTML elements between it and the </body>).
Async scripts, external or inline, run immediately when ready, independently of other scripts or the HTML document. But use it on functionality that doesn’t depend on anything.
No “bare” modules are allowed in HTML, though we can find them in NodeJS applications.
What is tree-shaking?
It’s the removal of unused exports, making the JavaScript code deployed lighter.
So on build time, transformations and optimizations may be applied:
- Unreachable code removed.
- Unused exports removed (“tree-shaking”).
- Development-specific statements like
consoleanddebuggerremoved. - Modern, bleeding-edge JavaScript syntax may be transformed to an older one with similar functionality using Babel.
- The resulting file is minified (spaces removed, variables replaced with shorter names, etc).
Export and Import
No semicolons after export class/function, like on Function or Class declaration.
For export [const | class | function] something , the import is import { something } from './my-module.js .
Same in this syntax:
|
|
But if there’s a lot to import, we can import everything as an object using import * as <obj>, for instance.
We can also use as to import under different names.
For instance, let’s import sayHi into the local variable hi for brevity, and import sayBye as bye.
What about export default?
-
Modules that contain a library, pack of functions are imported as
import { constant1, func1, etc } from '...'. -
Modules that declare a single entity, e.g. a module
user.jsexports onlyclass User.1 2 3 4 5 6 7 8 9 10// user.js export default class User { // just add "default" constructor(name) { this.name = name; } } // ... // main.js import User from "./user.js";
⚠️ There may be only one export default per file.
Named exports are explicit. They exactly name what they import, so we have that information from them; that’s a good thing.
But default export can be named to anything… And team members may use different names to import the same thing, and that’s not good.
Usually, to avoid that and keep the code consistent, there’s a rule that imported variables should correspond to file names.
Dynamic Imports
Although import() looks like a function call, it’s a special syntax that just happens to use parentheses (similar to super() in a class constructor).
It can be achieved with the import() expression that returns a Promise.
So we can’t copy import to a variable or use call/apply with it. It’s not a function.
If you need to load a module with a dynamic name, it looks like that:
|
|
Error Handling
Handling Errors with Try/Catch
No matter how great we’re at programming, sometimes our scripts have errors. You need to know how to use try/catch to handle them.
For try...catch to work, the code must be runnable. In other words, it should be valid JavaScript.
try...catch works synchronously, so make sure to put try...catch inside the asynchronous code, like setTimeout, otherwise, the error will be hard to catch.
For all built-in errors, the error object has two main properties: nameand message. Sometimes, you have stack properties as well, though it isn’t standard.
We can omit (error) in catch(error) { ... } in modern browser , if we don’t need the error details.
Catch should only process errors that it knows and “rethrow” all others.
To finish, like C#, you can “clean up” after the catch with finally { ... }.
Also, remember that variables are local inside try...catch...finally.
And you can use try...finally without a catch. But then any error fall through!
If you need to catch all errors, then use onerror event:
|
|
Custom Errors
Our unique applications will certainly throw and catch common errors from various APIs and libraries but you’ll also need to create your own Error types to correctly describe issues in your app. Make to know how to extend the Error class.
Extending Error built-in class involves using the extends keyword:
|
|
To get instance’s type of the error, use instanceof rather than the err.name == 'MyCustomError'. It’s cleaner and less prone to typing errors.
What is “wrapping exceptions”?
Review this example:
|
|
Conclusion
Understanding JavaScript should be an entry gate to the JavaScript world, even before training and working JavaScript framework like Vue, Angular or React.
I did train with Wes Bos and his ES6 and JavaScript 30 courses. So when I started with Vue, I was already familiar with many concepts.
Still, going through the Mid-level JavaScript certification, I learned that I didn’t know everything and that I needed to deepen some concepts.
I recommend this Certificates.dev program (no affiliation, I just like what they do and I have found it very helpful).
Follow me
Thanks for reading this article. Make sure to follow me on X, subscribe to my Substack publication and bookmark my blog to read more in the future.
Credits :
- Hero image is a capture of the homepage of Certificates.dev JavaScript Homepage.
- Some content is quoted from the JavaScript.info website or the MDN website and is used as a summary. The copyright remains theirs.
